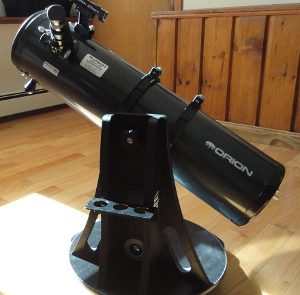
For quite a few of us, amateur star gazers, buying a telescope is a relatively rare event and thus you want to make it right.
Here I’d like to talk about what you want to look into before you purchase your own telescope. In another post, I also talk about binoculars (if you want to also have binoculars for nature trips…)
Optics
The one most important part of a telescope is its optic. Good optic means that you will see good images of celestial bodies. Bad optics and you’re going to have a hard time orienting the telescope properly, get distorted images, or have more difficulties getting sharp images.
Steady Mount
The mount has to be strong enough to support the telescope.
Even a slight wobble will mess up your high precision images, making it blurry. If you touch the telescope, it should remain very steady and not tremble, especially if the mount is motorized.
Also if that mount is motorized, the motor has to be working very smoothly.
Obviously most telescopes have all of these figured out and have excellent optics and steady mounts…
Size
The size is another parameter. The larger the telescope, the better the image. However, that requires large optics and that increases the price. For an amateur, you probably don’t want to good too large.
Portability
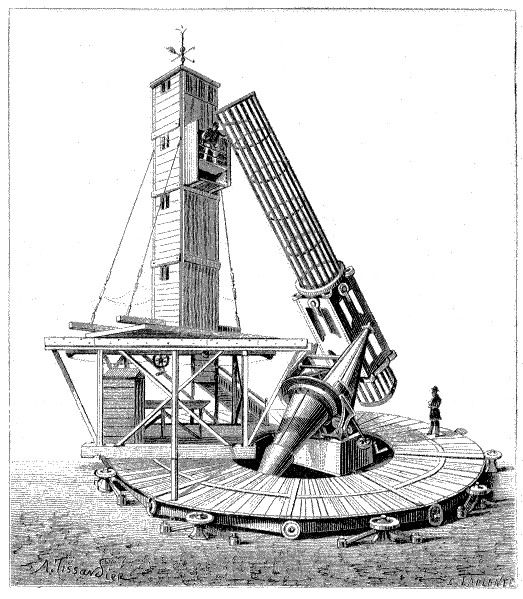
Very large telescopes are built over tall mountains over cloud covers, in places where astronomers are likely to have clear skies most of the year. A dry area is also better as humidity in the air will distort images. That is, if you have a really large telescope such as the Very Large Telescope (VLT) found in the Ataca Desert, Northern Chile which is 4 × 8.2 meters (4 × 27 ft). Imagine carrying that safely!
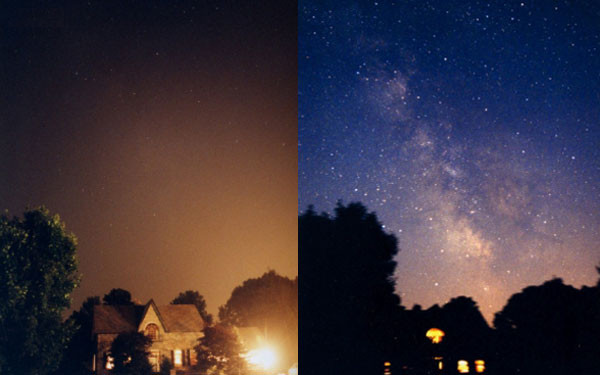
Unless you live on a mountain top by yourself, you are likely to have a lot of light pollution where you live, just like me. Any city produces a lot of light, we see it clearly from space. What that means is you’re going to put your telescope in your trunk, drive to a nice park, get it out, install it, watch the planets, stars, and galaxies from there, uninstall it, put it back in your trunk, go home…
Trust me, if you get a huge telescope, you probably won’t enjoy the transportation part. The watching should be great, though.
Aperture
A telescope has a mirror that collects the light from the sky. The aperture defines the diameter of that main mirror. This is most often indicated with a D.
In most cases, the aperture is indicated in millimeters. That’s because science prefers to use the metric system. Just in case I have the numbers both ways, in case you want to do a conversion, multiply inches by 25.4 to get millimeters. Divide millimeters by 25.4 to get inches. Divide millimeters by 10 to get centimeters. Multiply centimeters by 10 to get millimeters.
The minimum aperture you want is 70 mm (2.7559 inches—probably 2.8 in. if given in inches.) This will give you enough precision to see all the planets well, including Saturn’s rings and even the four largest moons of Jupiter. Each time it has an eerie effect on me. Seeing these moons, objects just hanging there… I’m used to our Moon, but somehow the moons around Jupiter feel different.
There is an example of what you can expect looking at Jupiter with your 70 mm telescope:
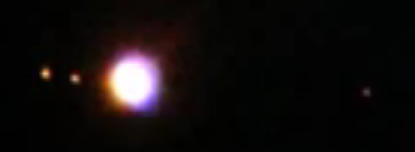
If you plan to do a lot of viewing from your own backyard in a small city, a much larger telescope will be required to see the same thing and it will remain a bit blurry. But a much larger telescope to use at home is not a bad thing. I would probably need a 200 mm (8 in.) telescope to check Jupiter like this in my backyard. You’d have the added benefit to take it out once a year and see nearby galaxies for what they are!
Magnification. Wait! What’s that?
Some telescopes may include a Magnification parameter (like 600×) instead of an Aperture. If it does and the aperture is not indicated, move on.
Telescopes do magnify but there are so many parameters that affect that parameter (i.e. weather conditions on Earth) that it’s not a good way to determine what you’re purchasing.
Telescopes gather more or less light and this is done using a lens or a curved mirror of larger or smaller size as presented above (Aperture).
In most cases magnification is considered to be about 2 × the diameter in millimeters in a perfect environment. So, roughly, a 70 mm telescope has 70 × 2 = 140 magnification in perfect conditions. Again, if you want to observe from a city, the amount of light pollution in that city will be a factor that strongly affects the magnification parameter.
Note that refractor telescopes have a magnifying lens. This is the type of telescope Galileo used to observe the solar system and Nebulae (which we now know as Galaxies.)
3 Types of Telescopes to Choose From
There are three types of telescopes.
The main two are the Refractors, as Galileo Galilei used, and the Reflectors which use a curved mirror instead of a lens, of which the first functional one was created by Isaac Newton. Now a day, we also build a combination of both of these that we call Catadioptric Telescopes. This is often referenced as a Compound Telescope as it kind of uses the Refractor and Reflector capabilities in one telescope.
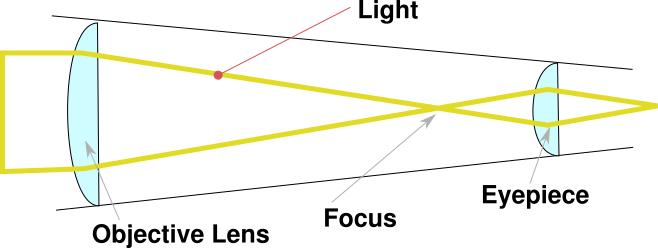
Refractor Telescope
Focal Length: 400mm
Focal Ratio: f/5
Click image for more info on Amazon.com
This type of Telescope is similar to using binoculars or a zoom lens on a camera just much better adapted to look at stars. It is pretty straight forward.
I personally do not think that’s the best choice to get started, even though it gives you a direct view of the celestial objects you want to observe (i.e. better quality image). In many cases these are more expensive than the Reflectors.
Older Refractor Telescopes
Older versions, developed at the end of the 16th century, had no mirrors. The images would go through a lens on one side of the telescope and then be reversed again through a second lens to refocus the image.
These models are very much the same things as binoculars today or those long telescopic lenses that were used for navigation and pirate detection on boats.
 Here is a representation of such a telescope. This shows Kepler’s work which is a continuation on the designed by Galileo. It makes use of two concave lenses which help greatly in getting a strong image (as more concentrated light reaches the observer’s eye.) This allowed for the observation of fainter objects. The problem with this design, though, is that objects are inverted (up-side-down).
This is the type of telescope Galileo used (albeit with different types of lenses). He had a magnification of about 30×. However, his lenses were of rather poor quality and the resulting images were blurry and distorted. He still was able to make quite a few wonderful discoveries such as what sunspots were, craters on our Moon, four moons orbiting Jupiter…
This works and if you have an opportunity, check out the pictures through such a telescope. It looks different. However, for your first telescope I really do not recommend old pirate technology (note that Reflectors are nearly as old, only pirates did not use that other technology.)
Modern Refractor Telescopes
Today, we usually have an extra mirror. This is why the eyepiece ends up on the side of the telescope instead of the back, but still toward the back of the telescope. The mirror flips the image back so you can see it straight up. The mechanism are the same as the old pirate technology.
Of course, in modern times our lenses and mirrors are of incredible quality compared to Galileo’s time.
For smaller telescopes, this type works fine and you generally get a better image quality. However, you cannot go very big without having the need for a really large optical lens which cost a lot of money.
The largest lens built for such a telescope was 1250 mm. It was at the Paris Observatory. The size of the telescope becomes prohibitive with this technology.
One advantage of this type of telescope is the low maintenance. The tube of the telescope is closed so no dust goes in. You just have to wipe the glass at the top for dust if any. The other type of telescope is generally open and thus has no dust guard.
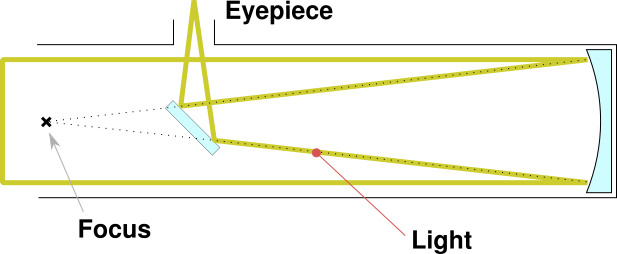
Reflecting Telescope (also called a Reflector)
These telescopes make use of a mirror at the rear. The mirror is curved just right to reflect the light against a small mirror at the top. That small mirror sends the light toward the eyepiece lens on the side.
The huge advantage of this designed is the required length of the telescope is greatly reduced.
One small drawback is the required adjustment of the small mirror once in a while. It will move as you transport the telescope to those fine and dark places. Frankly, it is a very small price to pay for the much larger aperture of these telescopes. Plus, the adjustment is really straight forward, you don’t need to have been at MIT, frankly (I’ve not been there either and I can do it!)
Finally, because today it is easier to build a large mirror without much defects at all than it is to build a large lens with a quality that gives similar results, for the same aperture reflectors are generally cheaper than refractors. Reflectors have a much smaller upper limit than refractors, although for us amateurs that limit is probably not a big concern.
Will I need a ladder?
No.
The eye piece is at the top of a Reflecting Telescope. As an observer who looks through the eye piece, you need access to it. Very large telescopes (over 400mm.) have their eye piece getting really high. For us, though, we’re fine on that one and you won’t need a ladder to use your telescope. However, large telescopes in observatories have large ladders.
When were Refractors invented?
Interestingly enough, the concept of a reflecting mirror used to magnify dates back to the 11th century. It was not put in practice for Astronomy until after Galileo used his Reflector. Actually Galileo participated in conversations about building a Refractor. The first reported such device would have been built as early as 1616, but the quality of the images were very poor mainly due to the bad quality of the mirror.
The first functional Refractor was around 1668, built by Newton. This is one reason we at times call a Refractor a Newtonian Telescope. However, at the time the metal used to build those mirrors gave a really dark image so it was abandoned for another 100 years.
Leave a Reply